Publish Foundry Agents to Teams Behind a Private Endpoint
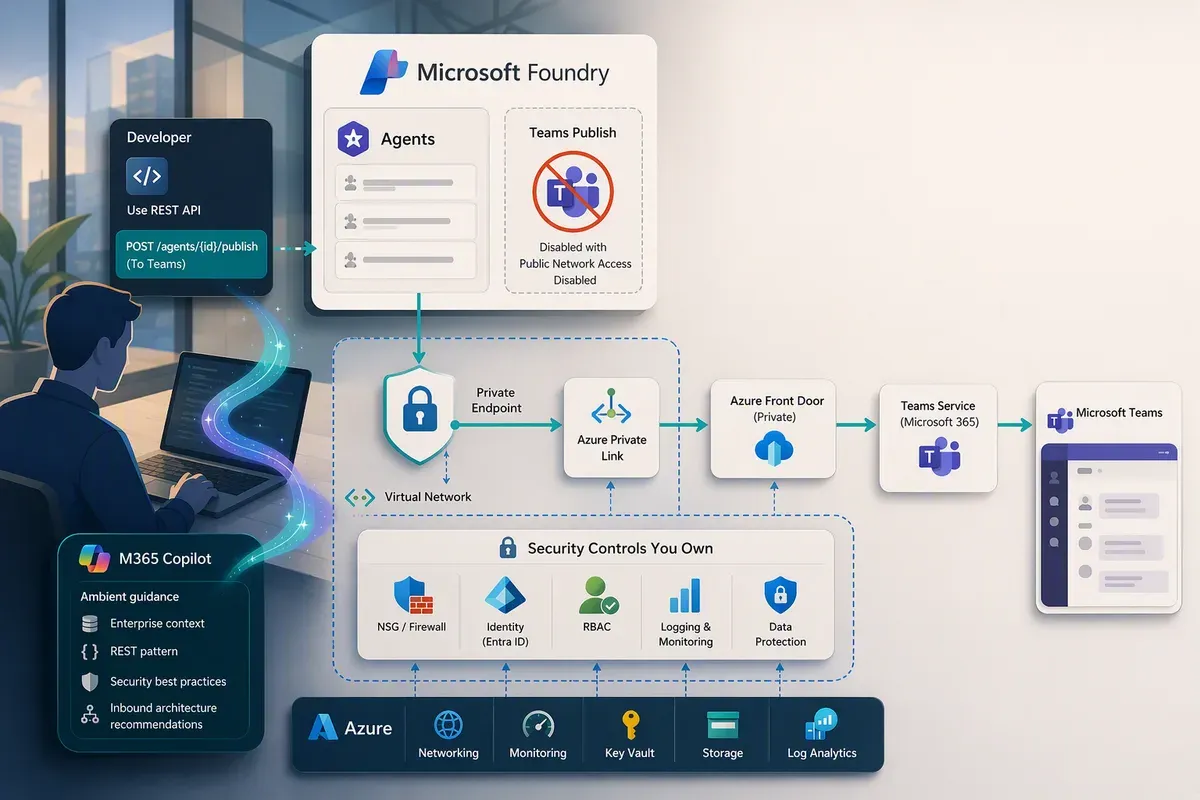
Publishing a Microsoft Foundry agent to Microsoft 365 Copilot and Teams is a button. You test the agent, pick an active version, fill in some metadata, choose a scope, and Foundry does the rest.
Then you lock the project down, and the button stops working.
There’s a one-line note in the publish how-to that’s easy to skim past: publishing from the Foundry portal isn’t available for projects that disable public network access. You have to use the REST API. That sentence is doing a lot of work, and what it’s really telling you is that in an isolated deployment, the inbound network path becomes your problem. Not Microsoft’s. Yours, with your firewall, your certificate, and your rules about who gets to reach the endpoint.
This is what that actually involves, in the order you’ll hit it.
Verified against Microsoft Learn on 2026-08-10. This surface is moving; check the linked docs before you build against it.
Why the portal button disappears
When someone types a message to your agent in Teams or Copilot, Microsoft’s Bot Channel Adapter POSTs that message to your agent’s messaging endpoint. The adapter runs on Microsoft’s side of the fence, outside your network.
Disable public network access and your Foundry endpoint resolves to a private IP inside your VNet. The adapter has nowhere to deliver to. The portal hides the button because a one-click flow can’t invent a network path into your infrastructure.
So the isolation you asked for and the delivery path Teams needs point in opposite directions. You resolve that by hand: a controlled, authenticated public entry point back into a network you deliberately made private.
Why?Doesn't Private Link solve this?
Not here. The docs are explicit: Private Link isn’t supported for Teams or Azure Bot Service integrations. You can put a private endpoint in front of the Foundry account, and you should, but the channel adapter still arrives from the public internet and still needs a public entry point to hit. Plan for a perimeter, not a private circuit.
The decision you can’t take back
Before any of the publishing mechanics, there’s a sequencing trap.
For hosted agents, network injection has to be included when you first create the Foundry account. Adding it to an existing account afterward isn’t supported. The configuration applies at the account level, so all projects in the account share one subnet configuration, and hosted agents and prompt agents share the same delegated subnet.
Translation: if you prototype on a public account and later decide you need isolation, you’re not flipping a setting. You’re standing up a new account and moving projects. Decide on bring-your-own VNet before you create the account, not after the pilot goes well.
The subnet is nearly as sticky. It can’t be shared across Foundry resources. Multiple Foundry resources can share a VNet, but each one needs its own dedicated agent runtime subnet. And because Azure won’t let you shrink a subnet that already has resources in it, treat the size you pick as effectively permanent. The Foundry resource and the VNet also have to be in the same region, though they don’t have to share a resource group.
What publishing actually does
Read this list carefully, because you’re about to reproduce it by hand. When you publish, Foundry:
- Validates the metadata you submitted, including display name, description, and version.
- Compiles a Teams app manifest as a
.zippackage. - Submits that manifest to the Microsoft 365 Copilot and Teams agent catalogs on your behalf.
- Enables the
activityprotocol on the agent endpoint, which is how the channel adapters exchange messages with it. - Enables an authorization scheme, either
BotServiceRbacorBotServiceTenant, based on the scope you chose.
None of that is network-specific. That’s why steps 1 through 4 of the REST flow work for any project, public or private. Only the last step is unique to a locked down deployment.
Before you start, get the permissions right, because this is the most common way
the flow fails. You need the Foundry User role on the project, plus permission
to create an Azure Bot Service resource and configure its channels in the target
resource group. That’s Microsoft.BotService/botServices/write and
Microsoft.BotService/botServices/channels/write. The Azure Bot Service
Contributor role grants exactly those. Foundry roles do not, and that catches
people, because everything else in the flow works with Foundry roles alone. Then
register the resource provider:
az provider register --namespace Microsoft.BotServiceWhy?Why the role names might not match what you see
Microsoft recently renamed the Foundry RBAC roles. Foundry User, Foundry Owner, Foundry Account Owner, and Foundry Project Manager were previously Azure AI User, Azure AI Owner, Azure AI Account Owner, and Azure AI Project Manager. The role IDs and permissions are unchanged, but you’ll see both names in the portal and the docs while the rename rolls out.
Steps 1 through 4: the REST equivalent of the button
Authenticate once against the https://ai.azure.com audience and reuse the token:
az login
az account get-access-token --resource https://ai.azure.com --query accessToken -o tsv
Get the agent’s identity. Call the Get agent API against your project
endpoint and copy instance_identity.principal_id out of the response. Grab your
tenant ID with az account show --query tenantId -o tsv. You need both to create
the bot.
Create the Azure Bot Service resource. This is the component that proxies messages between the channel adapters and your agent. Create it with public network access disabled and attach the Teams channel:
resource botService 'Microsoft.BotService/botServices@2022-09-15' = {
  name: botName
  kind: 'azurebot'
  location: 'global'
  sku: { name: botServiceSku }
  properties: {
    displayName: displayName
    endpoint: endpoint
    msaAppId: msaAppId
    msaAppTenantId: tenantId
    msaAppType: 'SingleTenant'
    publicNetworkAccess: 'Disabled'
  }
}

resource botServiceMsTeamsChannel 'Microsoft.BotService/botServices/channels@2021-03-01' = {
  parent: botService
  location: 'global'
  name: 'MsTeamsChannel'
  properties: { channelName: 'MsTeamsChannel' }
}
msaAppId is the agent principal ID from the previous step, and endpoint is the
agent’s activity protocol endpoint. Deploy it into the resource group that holds
your Foundry resource, then capture the ARM resource ID with az bot show, which
you’ll need to publish.
Publish. POST to microsoft365/publish on the agent, passing the bot’s ARM
ID and your store metadata. The API resolves the agent and its identity from the
agent name in the URL, so you don’t pass an agent GUID or bot ID in the body.
Four validation rules cause most of the rejections: appVersion can only contain
digits and periods and can’t start with 0, developerName is capped at 32
characters, fullDescription at 4,000, and every URL you supply has to be
https://. Icons are a fifth: a 192×192 color PNG and a 32×32 outline PNG, both
base64-encoded.
Why?The step you can skip, and when not to
The docs include a step between creating the bot and publishing: explicitly
enabling the activity protocol and the Bot Service authorization scheme on the
agent endpoint. It’s optional, because the publish call in the next step does
both automatically and overwrites the scheme to match your publishScope.
It’s worth doing by hand in exactly one case: when you want to prove message
delivery works through your new inbound path before you put an entry in the
agent store. On an isolated deployment, that’s a genuinely useful place to fail
early.
A successful call returns a titleId. The agent is now in the catalog and
completely unreachable, because nothing can deliver a message to it yet.
Step 5: building an inbound path you control
Here’s the part the docs describe in principle rather than prescription, because it depends entirely on what your organization already runs. Two things have to be true:
- A publicly reachable entry point. Something with a public IP you control that can route traffic inward. A firewall, a load balancer, a CDN, an application gateway. Whatever your network team already operates.
- TLS termination. Something has to terminate TLS and present a valid certificate for the hostname the channel adapter connects to, then forward the request to your agent’s private endpoint.
These can be one component or two. Azure Application Gateway does both, and it can present a certificate against a public IP without you supplying one. The other common shape is a firewall as the public entry point, with a DNAT rule forwarding 443 to a reverse proxy behind it that terminates TLS. Order doesn’t matter as long as both requirements are met end to end.
If the adapter can’t reach the agent, the failure is almost always in this chain.
Confirm the A record points at the firewall, the DNAT rule forwards 443 to the
proxy, and the proxy presents a certificate for the hostname in question.
Whatever sits at the perimeter, restrict inbound traffic to the published Bot Channel Adapter source ranges from Microsoft 365 URLs and IP address ranges. It costs nothing and it drops the internet’s background noise before any application-layer control has to think about it.
Authenticating what comes through the door
Every request from the channel adapter carries a signed JWT in the
Authorization header. Foundry validates that token and authorizes the end user,
so in most deployments you don’t need to do anything else.
If your security model requires traffic to be authenticated before it crosses a
boundary, you can validate the JWT yourself at the TLS-terminating component.
Use issuer https://api.botframework.com and an audience matching your bot’s
Microsoft App ID. Getting either wrong produces requests that reach the agent and
are rejected, which is a confusing failure mode until you know to look there.
There’s one detail here that deserves more attention than its placement in the docs suggests. A published agent’s Teams app can be installed in any tenant. Requests originating outside your organization can reach your endpoint before Foundry applies RBAC. Your perimeter is genuinely internet-facing, and the fact that you built it for one specific caller doesn’t mean only that caller will find it.
If you don’t have infrastructure that can validate a JWT, there’s a documented
lighter-weight fallback: restrict source IPs to the Teams required ranges, and
reject any request whose x-tenant-id header isn’t your own tenant. Be honest
about what that buys you. Any caller who reaches your endpoint can set a header,
so the tenant check only means something when it’s paired with the IP
restriction. It’s defense in depth for organizations that can’t do the strong
version, not an equivalent to it.
Don’t forget outbound
Inbound gets all the attention, and then the agent receives messages and never
replies. That’s an egress problem. Allow outbound access to
smba.trafficmanager.net, login.microsoftonline.com, and
login.botframework.com.
If you’re running Azure Firewall in front of the agent subnet, you’ll also want
the FQDNs listed under Managed Identity in the Azure Firewall integration guidance,
or the AzureActiveDirectory service tag. Source-code agent deployments need
their own deployment endpoints allowed on top of that.
Scope controls two different things
publishScope looks like a visibility setting. It’s actually setting visibility
and authorization together, and conflating them causes real confusion later.
Shared(the portal’s Just you) enablesBotServiceRbac. No admin approval. The agent appears under Your agents, and callers need the Azure permissions to invoke the agent in Foundry.Personalis accepted and treated the same way.Tenant(the portal’s People in your organization) enablesBotServiceTenant. Requires Microsoft 365 admin approval in the admin center, after which the agent appears under Built by your org and anyone in the tenant can call it.
The practical consequence: if you publish to Shared and hand colleagues a link,
they’ll hit authorization errors unless they have a role on the Foundry project.
That’s the RBAC scheme working correctly, not a bug. Publish to Tenant when you
want access governed by admin approval instead of Azure RBAC.
One licensing note that changes how you scope a pilot: end users don’t need a Microsoft 365 Copilot license to use a published agent in Copilot Chat. Usage that touches shared tenant data, like SharePoint or Copilot connectors, can incur usage-based charges.
Limitations to check before you promise anything
These aren’t networking-specific, but they shape what you can commit to, and it’s better to know before the demo:
- Private Link isn’t supported for Teams or Azure Bot Service integrations.
- No streaming responses and no citations for published agents. If you’re selling grounded answers with visible sources, check this against current docs before you design around it.
- File uploads and image generation don’t work in Microsoft 365. They do work in Teams.
One more for the runbook: if a conversation gets stuck after a tool error, later
messages keep failing. Microsoft 365 Copilot lets you start a new chat. Teams
doesn’t yet expose a way to reset the session, so you send the agent
/foundry_new_preview.
Sizing the subnet
Since you can’t practically resize it later, get this right the first time.
The delegated subnet must be delegated to Microsoft.App/environments and use
RFC 1918 space only: 10.0.0.0/8, 172.16.0.0/12, or 192.168.0.0/16. Class A
(10.x) ranges are only supported in specific regions, so check the supported
regions list before you plan around one, and use Class B or C elsewhere. CGNAT
and public ranges cause routing failures.
/27 is the documented minimum, and the docs are blunt that it’s risky. /24 is
the recommendation for production, and the reason is upgrade behavior rather than
steady-state load: platform upgrades run old and new revisions in parallel, so IP
consumption spikes during rollouts you don’t control the timing of. Target 80%
maximum utilization to absorb that.
Concurrent sessions are the constraint people miss. By default, usable subnet IPs
and concurrent sessions map 1:1, subject to a regional limit. A /27 gives you
roughly 27 usable IPs and about 17 concurrent sessions; a /26 gives you roughly
59 usable IPs and about 50, which is the documented maximum under the default
mapping. If you need more from the same subnet, open an Azure support request with
your subscription, region, and expected concurrency; support can raise the ratio
to 1:10.
Hosted agents and prompt agents consume that space very differently, and this is the part worth internalizing before you pick a size:
- Hosted agents run in a Micro VM attached to your subnet with a dedicated NIC and their own outbound IP. Their revisions consume IPs too, so a rollout temporarily runs old and new side by side. Budget per agent, per concurrent session, and for the upgrade overlap.
- Prompt agents route everything through a single-tenant data proxy, and their revisions don’t consume IPs at all. IPs are allocated at the project level, so every prompt agent in a project shares that project’s proxy. The proxy starts at one replica and scales out with traffic, at roughly one IP per ten pods, so the cost is driven by how much traffic a project takes, not by how many prompt agents you’ve defined.
That asymmetry is why “how many agents do you have” is the wrong sizing question.
If you’re mostly running prompt agents at modest traffic, /27 is genuinely
workable. If you’re running hosted agents at any scale, it isn’t.
What I’d tell an architect starting this
The publishing flow isn’t the hard part. It’s four API calls, and there’s a notebook that walks steps 1 through 4 if you’d rather read code than prose.
The hard part is that publishing an isolated agent to Teams means accepting an internet-facing entry point into a network you isolated on purpose, and owning the controls on it. That’s a design conversation with your network and security teams, not a task you complete at the end of a sprint. Have it before you pick the networking model, because the networking model is set at account creation and doesn’t change.
If you’re building this out, the two docs to read in full are Publish agents by using the REST API and VNet guidance and the networking deep dive. Between them they cover the IP allocation math and the failure modes I’ve only summarized here.
I’d like to hear how other people terminated the inbound path, particularly anyone who put Azure API Management in front of it and validated the JWT there. Reach out if you’ve built this.
Get the latest learnings
Occasional notes on Azure, AI, and cloud architecture. No spam, unsubscribe anytime.
Related articles
Finding GitHub Copilot Harness Agents Before PPAC Shows Them
The Power Platform admin center still doesn't flag which Copilot Studio agents run on the GitHub Copilot harness. The isCLIAgent property does, and Microsoft has now published governance guidance built on it.
Microsoft Foundry Canvas: A Visual Front End for Agent Code
Foundry Canvas puts model selection, toolboxes, guardrails, testing, and deployment in a Copilot side panel while leaving you the actual agent code.
Vibe Code Your Blog, Part 2: Build It, Then Ship It to Azure
Deploy an Astro blog to Azure Static Web Apps with OIDC, least-privilege access, and a walkthrough of the resources and trade-offs.
Comments
Comments are hosted by GitHub Discussions. Loading them connects your browser to giscus.app and GitHub.