Ready, Set, Vibe!(Using AI)
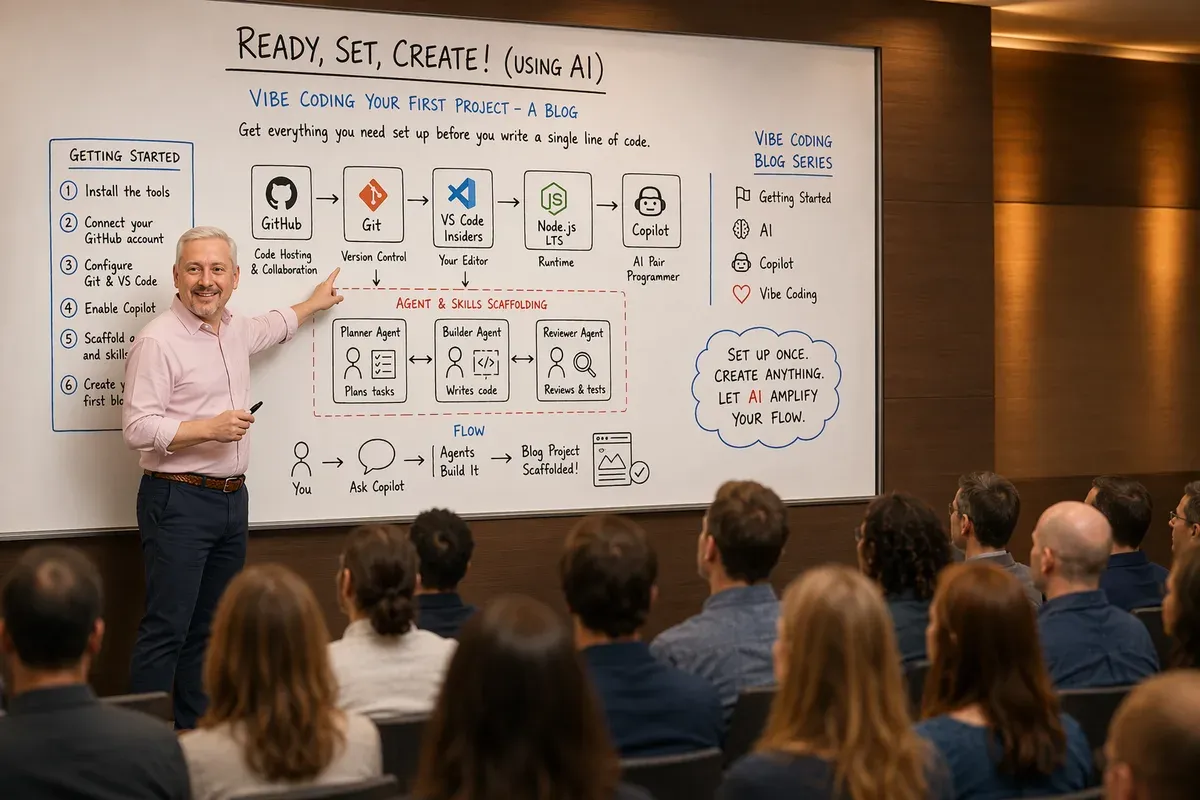
Here’s the part most “build an app with AI” tutorials skip: before the magic happens, you have to install a small pile of tools and get them talking to each other.
So this post is the unglamorous, deeply important half: the setup. By the end you’ll have everything a non-developer needs to sit down and vibe code a real, publishable blog: accounts, tools, a working command line, and an AI assistant wired up with the right agents and skills. Part 2 picks up where this leaves off and actually builds the site.
This is written for the technical-adjacent: you can follow instructions and you’re not scared of a terminal, but you’re not a career developer. That’s exactly who vibe coding is for.
One thing worth saying up front: there are many tools you can use to vibe code, and no single one is “correct.” Whichever tool you’re most comfortable with that gets the job done is the best one to use. This series leans on the GitHub Copilot app, because it handles the whole loop: agent, files, branches, diffs, terminal, and pull requests, without a separate editor in the mix. The GitHub Copilot CLI is worth a look too if you’d rather live in a terminal.
Why?Do I need to read this if I already have a blog?
No. If you already have a working project and dev environment, skip straight to the agent and skills scaffolding section near the end. That part is project-agnostic and worth doing regardless of what you’re building. Everything before it is for people starting from a blank machine.
What “vibe coding” is (and isn’t)
Vibe coding means describing what you want in plain language and steering an AI until the thing actually works, not typing a single prompt and walking away with a finished app. It’s a conversation: you set the direction, the AI proposes, you push back, and you converge on something real.
I go deep on the mindset in Coding with AI: A Neurodivergent Non-Coder’s Guide to Building Real Apps: plan mode, picking a model, knowing when the AI has wandered off. Read that for the why. This post is the how do I even get started.
Before you install anything: the plan
You’re going to set up six things, in this order, because each one builds on the last:
- A GitHub account: your home base for code, history, and hosting.
- Git: the tool that actually tracks your changes locally.
- The GitHub CLI (
gh): the tool that introduces your local Git to your GitHub account, so pushing your work just works. - The GitHub Copilot app: where you’ll do the actual vibe coding.
- Node LTS + npm: the engine that runs a modern website.
- Python (latest): not strictly required to run the blog, but so much of the vibe-coding ecosystem (scripts, tools, MCP servers, AI helpers) assumes it’s there that you’ll save yourself pain by installing it now.
Then you’ll scaffold a home for your agents and skills so the AI works with you instead of guessing. Let’s go.
A note on operating systems: I’m writing the commands Windows-first, since that’s what most first-timers are on. Where macOS or Linux differ, I’ll call it out inline.
Install the six tools
Work through these in order. Each one assumes the previous is done.
Step 1: Create a GitHub account
Head to github.com and sign up. Pick a username you won’t be embarrassed by later. It shows up in your project URLs. Verify the confirmation email before you close the tab; an unverified account can’t push code or use GitHub Copilot.
Why?Why do I need GitHub for a blog?
Three reasons. First, it’s a backup: your writing and code live safely in the cloud, not just on one laptop. Second, it’s a time machine: every change is versioned, so you can undo anything, even a week later. Third, it’s free hosting and the front door for AI tools: GitHub Copilot and the agents you’ll use authenticate through your GitHub identity. One account unlocks all of it.
While you’re there, enable two-factor authentication in your account settings. GitHub requires it for most contributors now, and you don’t want to hit that wall mid-project. When GitHub shows you the recovery codes, save them somewhere you’ll still have access to if you lose your phone. People skip this step constantly and then get locked out of the account holding all their work.
Why?Free, Pro, Enterprise, or Education — which one do I need?
A free GitHub account is enough for the repositories and Actions work in this series. GitHub Copilot Free is more limited, though, and doesn’t include GitHub Copilot cloud agent. If you want the asynchronous branch-and-PR workflow described here, you’ll need a paid GitHub Copilot plan or an eligible Education plan.
As of July 2026, GitHub Copilot Pro is $10 USD per month. It includes unlimited completions, access to a selection of models, GitHub Copilot cloud agent, and a monthly allowance of AI credits. Check the plan table before buying because prices, model access, and usage allowances change.
And if you’re a student or teacher, don’t pay a cent yet. Apply for GitHub Education first. Verified students get the free GitHub Copilot Student plan, which has unlimited completions but more limited chat, agent, and model access than Pro. Verified teachers are eligible for GitHub Copilot Pro at no charge.
Step 2: Install Git (this is not the same as a GitHub account)
This trips people up constantly: your GitHub account lives on the web, but Git is a separate program that runs on your computer and does the actual work of tracking changes.
- Windows: download and run the installer from git-scm.com. Accept the defaults, with one exception. On the screen titled Choosing the default editor used by Git, the default is Vim, which is famously hard to get out of if you’ve never used it. Pick Notepad unless you already have a favorite.
- macOS: run
git --versionin Terminal; if Git isn’t installed, macOS offers to install it for you. Or use Homebrew:brew install git. - Linux:
sudo apt install git(Debian/Ubuntu) or your distro’s equivalent.
Once installed, tell Git who you are. This stamps your name on every change you save. Then set the default branch name to match GitHub’s:
git config --global user.name "Your Name"
git config --global user.email "you@example.com"
git config --global init.defaultBranch mainWhy?Why does Git need my name and email?
Every saved change (a “commit”) records who made it. Use the same email as your GitHub account so your work is properly attributed. It’s not a login, just a label on your history.
Why?What's that third line about?
Git has historically named the first branch in a new repository master, while
GitHub names it main. Leave them mismatched and your first push lands in a
branch GitHub doesn’t consider the default, which quietly breaks deployment
workflows in Part 2 and produces a repository with two half-empty branches.
Setting init.defaultBranch to main once, now, avoids the whole mess. It only
affects repositories you create after running it.
Step 3: Connect Git to GitHub with the GitHub CLI
You now have an account in the cloud and Git on your machine, and the two have never met. Nothing you commit locally reaches GitHub until you can prove to GitHub that you’re you.
The old answer to that was SSH keys, or a personal access token you pasted into a
prompt once and then lost. The current answer is the GitHub CLI (gh), which
handles the login and then configures Git to reuse those credentials from that
point on. This series leans on gh in Part 2 as well, so install it now.
- Windows:
winget install --id GitHub.cliin a terminal, or grab the installer from cli.github.com. - macOS:
brew install gh. - Linux: follow the package instructions for your distro at cli.github.com.
Close and reopen your terminal, confirm gh is on your PATH, then log in:
gh --version
gh auth login
gh auth login asks a short series of questions. The answers that matter:
- What account do you want to log into? →
GitHub.com - What is your preferred protocol for Git operations? →
HTTPS - Authenticate Git with your GitHub credentials? →
Yes - How would you like to authenticate GitHub CLI? →
Login with a web browser
It prints a one-time code, opens your browser, and you paste the code and approve. Then confirm it stuck:
gh auth statusYou should see your GitHub username and the scopes you’re authenticated with. If you do, your machine and your account are connected.
Why?What did answering 'Yes' to question 3 actually do?
It pointed Git’s credential helper at your GitHub CLI login. From then on,
git push quietly borrows that token instead of stopping to ask you for a
password. This is the single step that makes “I committed something” and “it’s
safely on GitHub” feel like one action instead of two.
Skip it and your first push throws a confusing authentication prompt, and your GitHub password won’t work there, because GitHub stopped accepting passwords for Git operations years ago.
Why?HTTPS or SSH?
Both work. HTTPS is the easier first answer: no keys to generate, no agent
to configure, and it gets through corporate networks that block SSH. SSH is
worth learning later, especially if you juggle personal and work accounts on one
machine. Start with HTTPS. You can switch any time with gh auth login again.
Step 4: Install the GitHub Copilot app
This is the one you’ll actually spend your time in. The GitHub Copilot app is GitHub’s native desktop experience for agent-driven development, and it runs on macOS, Windows, and Linux. Download it, then sign in with the GitHub account from Step 1.
The reason it’s worth making this your home base: it covers the whole loop without a second tool. Each session gets its own workspace with its own branch and files, so two experiments can’t step on each other. You inspect diffs, run terminal commands, preview the site in a built-in browser, and open or merge pull requests without leaving the session you’re in. That’s the entire cycle you’d otherwise be stitching together across an editor, a terminal, and a browser.
Why?Do I need a paid plan for the app?
No. The GitHub Copilot app is included on every GitHub Copilot plan, including Free, and you can bring your own model key instead. Where the paid plans matter is elsewhere: GitHub Copilot cloud agent and GitHub Copilot code review start at Pro. So the app itself isn’t the paywall; the asynchronous “assign it and walk away” workflow is.
There’s a second surface worth knowing about, and it needs no install: GitHub Copilot cloud agent on GitHub.com. You describe work in the browser, the agent runs it on a branch, and it comes back as a pull request for you to review. It’s the asynchronous counterpart to the GitHub Copilot app, and it’s on a Pro plan or better.
Why?App or cloud agent — which do I reach for?
I use both, for different shapes of work. The GitHub Copilot app is for anything I want to watch and steer: building a feature, debugging, poking at output as it appears. GitHub Copilot cloud agent is for “describe it, let it run, review the PR when I get back,” the tasks I can hand off and stop thinking about. Start with the app. Cloud agent makes more sense once you have a repository and a rhythm, which is Part 2.
Step 5: Install Node.js (LTS) and confirm npm works
A modern blog is built and previewed by Node.js, and Node ships with npm, the tool that installs the building blocks your site depends on.
Install the LTS version, not “Current,” from nodejs.org.
Why?Why LTS and not the newest 'Current' version?
LTS stands for “Long-Term Support.” It’s the stable, boring, widely-compatible version that every tutorial and tool expects. “Current” is the bleeding edge: newer, but more likely to surface bugs you won’t yet know how to debug. As a beginner, boring is your friend.
After installing, close and reopen your terminal, then verify both tools are found:
node --version
npm --version
You should see version numbers (for example, v24.x.x and 11.x.x; Node 24 is
the current LTS line, and it ships npm 11). If instead you see something like
'npm' is not recognized or command not found, your PATH isn’t picking up
Node yet.
Why?What is PATH, and why would npm 'not be found'?
PATH is the list of folders your terminal searches when you type a command.
If node and npm aren’t found, it means the terminal doesn’t know where the
installer put them. The fix is almost never manual PATH surgery.
The reliable fix for a “not found” error:
- Fully quit and reopen your terminal (and the GitHub Copilot app). The
installer updates
PATH, but only new terminal sessions see it. - Restart your computer if reopening the terminal doesn’t do it.
- If it still fails, don’t hand-edit PATH. Instead, uninstall Node and
reinstall it with a version manager, which handles PATH for you:
fnmornvm-windowson Windows;nvmon macOS/Linux.
Why?Why a version manager is the better long-term answer
A version manager installs Node in a predictable place, wires up your PATH automatically, and lets you switch Node versions per project later. It removes the entire class of “npm not found” problems instead of patching one instance.
Step 6: Install Python (latest)
You won’t write Python to build the blog itself, but the rest of the vibe-coding world assumes you have it. Half the helper scripts, dev tools, and MCP servers you’ll bump into over the next few months start with “just run this Python script.” Install it now and you’ll never think about it again.
Grab the latest stable release, 3.14 as I write this, not an old 3.9 or 3.10, from python.org/downloads.
- Windows: run the installer and check the box that says “Add python.exe to PATH” on the very first screen. That one checkbox saves you an hour of troubleshooting later.
- macOS: the installer from python.org is the most predictable route. You
can also use Homebrew:
brew install python. - Linux: many distros already include Python 3, but don’t assume the bundled
version is current. Confirm with
python3 --version; if it’s older than 3.12, install a newer one via your distro’s package manager or pyenv.
After installing, close and reopen your terminal, then verify:
# Windows
python --version
python -m pip --version

# macOS / Linux
python3 --version
python3 -m pip --version
You should see a supported Python 3 release and a matching pip version.
Why?What if a tool complains about my Python version?
Packaging occasionally lags a brand-new Python release by a few months, so a library can refuse to install on the newest minor version. If that happens, install the previous minor release alongside it rather than fighting the tool. Nothing in this series needs the bleeding edge. The point of installing Python now is simply that it’s there when something asks for it.
Why?Why `python` on Windows but `python3` on macOS/Linux?
Command naming depends on the operating system, installer, and distribution.
Current macOS releases expose an
Apple-managed python3 for developer tools, and most Linux packaging also uses
python3; neither implies that an old Python 2 is still installed as python.
The official Windows installer normally provides python. Use the command
shown for your platform and avoid replacing the operating system’s managed
Python.
On Windows, if python isn’t found after installing, it’s usually the PATH
checkbox. Reinstall and make sure it’s ticked, or add Python to your PATH
through the installer’s Modify option. On macOS or Linux, verify python3
instead. Reopen the terminal before changing PATH by hand.
Verify everything before you build
Run this quick checklist in a fresh terminal. Each command should print a version or a success message, with no errors:
git --version          # e.g. git version 2.53.x
gh --version           # e.g. gh version 2.9x.x
gh auth status         # should name your GitHub account
node --version         # e.g. v24.x.x
npm --version          # e.g. 11.x.x
python --version       # e.g. Python 3.14.x  (try 'python3' on macOS/Linux)
If any line errors out, fix that tool before moving on. Every later step assumes these all work.
On the version numbers: these were current as of August 2026. Yours will almost certainly be higher, and that’s fine. What matters is that each command returns a version instead of “not recognized,” not that it matches mine.
Keeping your local disk tidy
Everything above installs your tools locally, on your own machine. That’s a perfectly good way to work, but it comes with a gotcha I learned the hard way.
After spinning up project after project, I ran my hard drive out of space. Here’s the thing that took me too long to realize: once your code is committed and pushed to a GitHub repo, you don’t need to keep a local copy forever. The repo is the source of truth. When you’re done working on a project for a while and you’re tight on disk, delete the local folder. You can always clone it back down the moment you want to pick it up again.
Using source control through GitHub Copilot
Git is the safety net under everything you vibe code, and the good news is you barely have to operate it by hand anymore. The GitHub Copilot app gives every session its own workspace with its own branch and files, so two pieces of work in flight can’t tangle with each other. You review diffs in the session, run terminal checks there, and open or merge the pull request from the same window.
Which means most source control now happens by asking:
Commit what we just changed with a clear message, then push it.The agent proposes the commands, you read them, you approve. That’s the loop.
You should still understand what’s happening underneath, though, because the day something goes sideways you’ll want the vocabulary. Four ideas cover almost all of it.
A commit is a labeled snapshot. It records what changed, who changed it, and when. Commit every time something works. That’s your undo button for the whole project. Ask for it in plain language, or run it yourself:
git add .
git commit -m "Add the about page"
git push
A branch is a parallel copy of your project where you can experiment without
touching your known-good version. Sessions in the app already come with their
own branch, so you get this without thinking about it. If the experiment works,
you merge it. If it doesn’t, you abandon the branch and main never knew.
A diff shows exactly what changed, old version against new. Read the diff before you accept the AI’s work. This is the highest-value habit in this entire post, and it’s why the app puts diff review in the same window as the agent that wrote the code.
A pull request is a diff with a conversation attached. It’s how you review a
batch of work before it lands on main, and it’s where GitHub Copilot code
review can weigh in if you’re on a paid plan.
Why?What's the difference between staging and committing?
Staging is choosing which changes go into the next snapshot; committing
actually takes the snapshot. The two-step exists so you can commit a focused set
of related changes, say, just the edits to one post, while leaving unrelated
work for a separate commit. git add . stages everything, which is fine most of
the time. Reach for selective staging when you’ve changed two unrelated things
at once and want history that still makes sense in six months.
Why?What happens if I hit a merge conflict?
A conflict happens when two changes touch the same lines and Git can’t decide
which to keep. That’s common when you work across two branches or two machines.
Git marks the disputed section in the file with <<<<<<< and >>>>>>> markers
and waits for you.
This is a great thing to hand straight to the agent: point it at the file and ask it to explain both sides before you choose. It sounds alarming the first time and it really isn’t.
Why?Can I see the history of one specific file?
Yes, and it’s genuinely useful for a blog. git log --follow -p path/to/post.mdx
walks every change ever made to that one file, newest first, with the diffs
inline. Or skip the flags and ask: “show me every change to this post and
summarize what moved.”
Between the agent writing the code and Git recording every step, source control stops being a chore and becomes what it should be: a constant, low-effort safety net you’ll be glad exists the first time something breaks.
Scaffold a home for your agents and skills
This is the step that separates “AI autocomplete” from actually vibe coding. Skills and agents are reusable instructions you give the AI so it stops guessing and starts working the way you want. You’ll want two homes for them.
Per-project customization lives inside each repository, in a .github
folder. This travels with the project, so anyone who clones it (including future
you) gets the same AI behavior:
your-blog/
└── .github/
    ├── copilot-instructions.md   # always-on context about THIS project
    ├── instructions/             # rules scoped to certain files
    ├── prompts/                  # reusable /slash-command prompts
    ├── agents/                   # custom agents (*.agent.md)
    └── skills/                   # project-specific skills (SKILL.md)
Your personal, portable library lives in your home folder and follows you across every project:
~/.agents/
└── skills/
    └── my-skill/
└── SKILL.mdWhy?What does `~` mean?
~ is shorthand for your user home directory. On macOS and Linux that’s
something like /home/yourname. On Windows it’s C:\Users\yourname, where
yourname is typically your Entra ID (work or school account) without the
@domain.com part, so russ@contoso.com becomes C:\Users\russ. So
~/.agents/skills just means the .agents\skills folder inside your home
directory.
Why?Why two separate locations?
The .github folder is team- and project-scoped. It ships with the repo so
the customization is guaranteed to be there. Your ~/.agents/skills folder is
personal and portable: reusable skills you want on hand no matter what
you’re building. GitHub Copilot reads both, so you get project-specific rules
and your own toolkit at the same time.
You don’t need to author anything elaborate yet, and you don’t need to create the folders by hand either. This is a perfect first taste of vibe coding: let the AI scaffold it for you. Start a session in the GitHub Copilot app and paste a prompt like this:
Create my portable skills library at ~/.agents/skills. Just create the
empty folder structure — don't add any files yet. Show me the command
before you run it so I can approve it.
The AI will propose a command (it’ll be something like mkdir -p ~/.agents/skills), wait for you to approve it, and then run it in the terminal.
Reading and approving that command before it runs is exactly the safe habit
you’ll rely on for the rest of this series.
Why?Why did I have to ask it to show me the command first?
Because I wanted you to see the approval step at least once. Agents can be configured to run some commands without stopping to ask, which is a reasonable trade once you trust a workflow, but it’s a terrible default while you’re learning what the tool will do. Asking to see commands before they run costs you a few seconds and teaches you to read what’s about to happen to your machine.
That’s the portable library ready. The project-scoped .github files come to
life in Part 2, once your blog repository actually exists. There’s no point
writing project instructions before there’s a project to describe.
Why?Where do NEW skills go later?
Author your own skills under ~/.agents/skills/<name>/SKILL.md (portable) or a
project’s .github/skills/ (ships with that repo). Avoid editing any
tool-managed or “bundled” skill folders. Those get overwritten when the tool
updates.
If you want to go deeper on plan mode, picking a model, and how skills change the way you work, that’s all in the vibe coding lessons post.
Vibe coding safely (read this before Part 2)
AI will happily run terminal commands and rewrite files for you. That’s powerful and occasionally dangerous. A few habits keep you out of trouble:
- Commit early and often. Every time something works, save it to Git. It’s your undo button for the whole project.
- Work on a branch for anything risky. Branches let you experiment without touching your known-good version.
- Read commands before you approve them. If the AI wants to delete files or run something you don’t recognize, slow down and ask it to explain first.
- Never put secrets in your code. API keys and passwords belong in environment variables or a secrets store, never committed to the repo, which may become public.
Why?Why does this matter for a simple blog?
Because the habits you build now carry into everything you vibe code later. A blog is low-stakes: the perfect place to learn to commit often, use branches, and review what the AI does before it matters on a real project.
Make security the AI’s default, not an afterthought
The habits above keep you safe. The next step is making sure the code the AI writes is safe too, because an AI left to its own devices will happily reach for whatever pattern was most common in its training data, and “most common” is very often “least secure.” Hard-coded connection strings, public storage accounts, keys in config files, wide-open CORS. It’s not malicious; it just doesn’t know your bar unless you set it.
You set that bar by grounding the AI in real security guidance and making that guidance the highest priority in every instruction, skill, and agent you use. Three levers do most of the work:
- Wire up the Azure MCP and use its Azure best-practices tool. The Azure MCP server ships a built-in Azure best-practices capability the AI can call before it writes or deploys anything that touches Azure. It returns secure, production-grade guidance: managed identities instead of connection strings, Key Vault for secrets, least-privilege role assignments, private networking, and secure defaults, grounded in current Microsoft recommendations rather than whatever the model half-remembers. Ask the AI to “check Azure best practices first” and it’ll pull that guidance in before generating code.
- Pair it with the Microsoft Learn MCP so security and identity guidance comes straight from the current official docs, including Entra ID, Defender, and Azure security baselines, instead of stale training data.
- Lead with security in your own instructions, skills, and agents. When you
scaffold the
.githubfiles in Part 2, put security first incopilot-instructions.md: least privilege, no secrets in code, managed identities, input validation, secure defaults. A short, explicit “security comes first” rule at the top of your instructions steers every response after it.
Why?What's a 'security-focused skill or agent'?
It’s a reusable instruction set whose whole job is to hold the AI to a security bar. You can create a security-review skill that runs a checklist before you ship: secrets scanning, dependency risk, auth and access review, and input validation. Or you can create a dedicated security-review agent you hand a diff to for a second opinion. The point is the same as any skill: promote your best “did we do this securely?” prompts into a permanent capability the AI applies every time, instead of hoping you remember to ask.
Why?Why put security at the *top* of my instructions?
Instructions are read top to bottom, and earlier rules carry more weight when the AI has to make a trade-off. If “ship it fast” sits above “do it securely,” guess which one wins under pressure. Leading with least privilege, no hard-coded secrets, and secure-by-default patterns makes security the lens everything else is filtered through, not a box you check at the end.
The vibe-coding-specific risks worth knowing
Classic web vulnerabilities still apply, but AI-generated code adds a few failure modes of its own. These are the ones I’d burn into your habits from day one:
- Never ship code you don’t understand. Keep a human in the loop. The AI optimizes for “this runs,” not “this is safe.” If you can’t explain what a block does, don’t merge it. Ask the AI to walk you through it first.
- Verify every dependency before you install it. Models hallucinate package
names, and attackers register those made-up names with malware inside
(“slopsquatting”). Before you
npm installanything the AI suggests, confirm the package is real, actively maintained, and spelled exactly right. Then pin the version and commit your lockfile. - Ask for security explicitly in the prompt. Don’t assume the AI will validate input, apply least privilege, or avoid hard-coded secrets on its own. Say so. “Follow secure coding practices, validate all input server-side, no secrets in code” costs you one sentence and changes what you get back.
- Let a scanner watch your back. Turn on secret scanning and dependency alerts (GitHub gives you both for free), and run them automatically, not just when you remember. A scanner catches the leaked key or vulnerable package you’ll eventually miss by eye.
- Treat tool and web output as untrusted. Content the AI pulls from a webpage, a file, or an API can carry hidden instructions (prompt injection). Never let something the AI read trigger something risky it then does without you confirming it.
Why?What's 'slopsquatting' and why should I care for a blog?
When an AI invents a package name that doesn’t exist, an attacker can register that exact name and fill it with malicious code, so the next person who trusts the AI’s suggestion installs malware. It’s a real, growing supply-chain attack. The fix is cheap: don’t install anything you haven’t confirmed is the genuine, maintained package. Building that reflex on a low-stakes blog means you’ll have it when the stakes are real.
Steal a ready-made security skill
Everything above is easier to enforce when it’s written down as a skill the AI
pulls in automatically. This repo ships one you can copy: a vibesec-skill
under .github/skills/ that captures secure-coding practices across access
control, XSS, CSRF, secrets, SSRF, file uploads, SQL injection, JWTs, and the
AI-specific risks above, and tells the AI to treat security as the highest
priority and fail closed when it’s unsure.
Drop a copy into your own project’s .github/skills/ (or your portable
~/.agents/skills/), and the AI will apply it whenever you’re building a web app
or ask for a security review. No re-explaining required.
Why?Do I have to write that skill myself?
No. That’s the whole point of skills being portable files: grab an existing one, drop it in, and it just works. Refine it over time as you learn your own bar. When you catch a security lesson the skill doesn’t cover yet, add a line. Future you (and the AI) inherit it automatically.
What you should have right now
Before moving on, make sure all of this is true. Part 2 assumes every one of them:
- ✅ A GitHub account with a verified email and 2FA enabled, and your recovery codes saved somewhere safe.
- ✅ Git installed and configured with your name, email, and
init.defaultBranchset tomain. - ✅
gh auth statusreports you’re logged in, and Git is set to reuse those credentials. - ✅ The GitHub Copilot app installed, signed in, and responding.
- ✅
node,npm,git,gh, andpython(Windows) orpython3(macOS/Linux) all return versions in a fresh terminal. - ✅ A
~/.agents/skillsfolder ready for your portable skills. - ✅ You understand the safety basics: commit often, branch for risk, no secrets.
- ✅ You know how to make security the AI’s default: ground it in the Azure and MS Learn MCPs, and lead every instruction, skill, and agent with security first.
- ✅ You’ve internalized the vibe-coding risks: review what you can’t explain, verify every dependency before installing, and let a scanner watch your back.
If any box is unchecked, sort it now. A shaky foundation turns Part 2 into a frustrating detour hunt instead of the fun part.
Next: actually building the thing
That’s the setup: the part nobody warns you about, now behind you. In
Part 2,
we put it all to work: scaffolding the blog with Astro, writing a
copilot-instructions.md so the AI understands your project, steering it through
your first real feature with plan mode, and deploying the finished site to the
internet with a live URL to share.
Your homework before Part 2: run the verification checklist one more time and make sure every command comes back clean. Then subscribe to the RSS feed so you don’t miss the build, or if you get stuck on setup, the contact page is the fastest way to reach me.
Get the latest learnings
Occasional notes on Azure, AI, and cloud architecture. No spam, unsubscribe anytime.
Related articles
Customizing GitHub Copilot: A Quickstart for the Best Experience
A 20-minute quickstart for customizing the GitHub Copilot app as a non-coder: instructions, agent skills, MCP servers, custom agents, and plugins.
The Vibe-Coding/Engineering Stack I Actually Ship With
The AI tools I use to design, ground, review, and ship vibe-coded projects, from Impeccable and Microsoft Foundry to MCPs and Power Platform Skills.
Coding with AI: A Neurodivergent Non-Coder's Guide to Building Real Apps
Field-tested lessons from shipping with AI: use plan mode, build reusable skills, choose models deliberately, and keep a reviewer in the loop.
Comments
Comments are hosted by GitHub Discussions. Loading them connects your browser to giscus.app and GitHub.